
Working with images
The theme uses two sizes of image for elements like Cards, Banners and Featured Images. These are rectangular (aspect ration 2:1, at least 800px x 400px). It is always advisable to crop images which are used in these elements before they are uploaded to ensure they display correctly. Images which are inserted into pages should be at least 800px across, unless they are aligned to the right or left with the text of the page.
Please ensure that any images used on the site are Copyright free or have Creative Commons licenses which allow their re-use and adaptation to the sizes used on the site (i.e. allows derivatives to be made). This guide has used royalty-free images from unsplash and University images from https://imagelibrary.leeds.ac.uk/. If you source images from Flickr, use the advanced search form, or alternative you can use a service such as Vecteezy, or pixabay .
Creative commons Flickr images should be credited to their creators by linking to the image and the user profile in the caption, as well as linking to the Creative commons license the image was issued under. For any of the image services mentioned, please adhere to any guidelines regarding image attribution and licensing.
Adding Images
You can open the Media Library by clicking on the Add Media button which is usually displayed above a rich text editing area. There are other parts of the theme (Featured Images and the Widgets in the Widgets Page Template used for Landing Pages for example) which also have various buttons and links to open the Media Library to facilitate the inclusion of images.
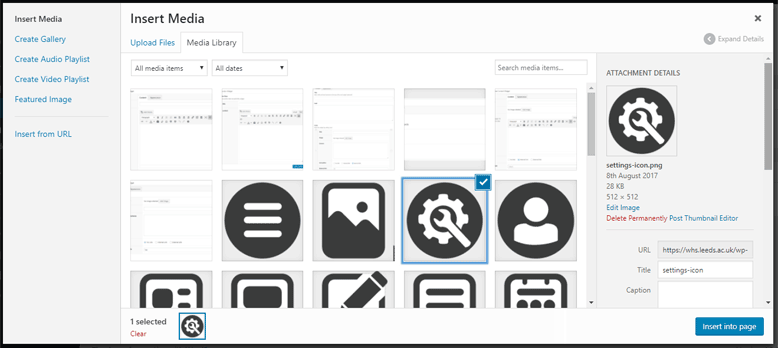
Choosing an existing image from the Media Library
The Media Library opens to show you the files/images which have been uploaded to the site so far. You can make a selection here by clicking on the image, then clicking on the blue button in the bottom right corner.
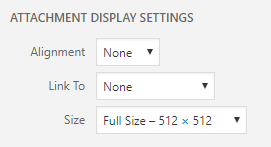 If you are inserting an image into a Post or Page, you can specify the image size, alignment, and whether you would like the image to link to something in a form at the bottom of the right hand pane in a section called Attachment Display Settings.
When you align an image to the right or left, text will wrap around the image. Aligning an image centrally or with no alignment will break the text where the image is inserted.
Linking from the image to the media file will result in the image loading at its full size when clicked, linking to an attachment page will display the image along with its caption and description in a separate page, and linking to a Custom URL will cause that URL to load when the image is clicked.
There are some image sizes which are derived from your original by WordPress – you should be able to choose the size you want to insert using the drop-down menu.

Upload form in the Media Library
If you need to upload a new file, click on the Upload Files tab and you can either select files from your local filesystem or drag and drop files to upload them.
Once you have added an image to the editor, you can change the alignment, image size, link or add a caption by clicking on the edit tool (pencil) when you select the image in the editor.
Accessibility
You will need to make sure that the visual content you're adding has been given appropriate consideration for accessibility.
Find out more at: https://digitalaccessibility.leeds.ac.uk/guidance/images/